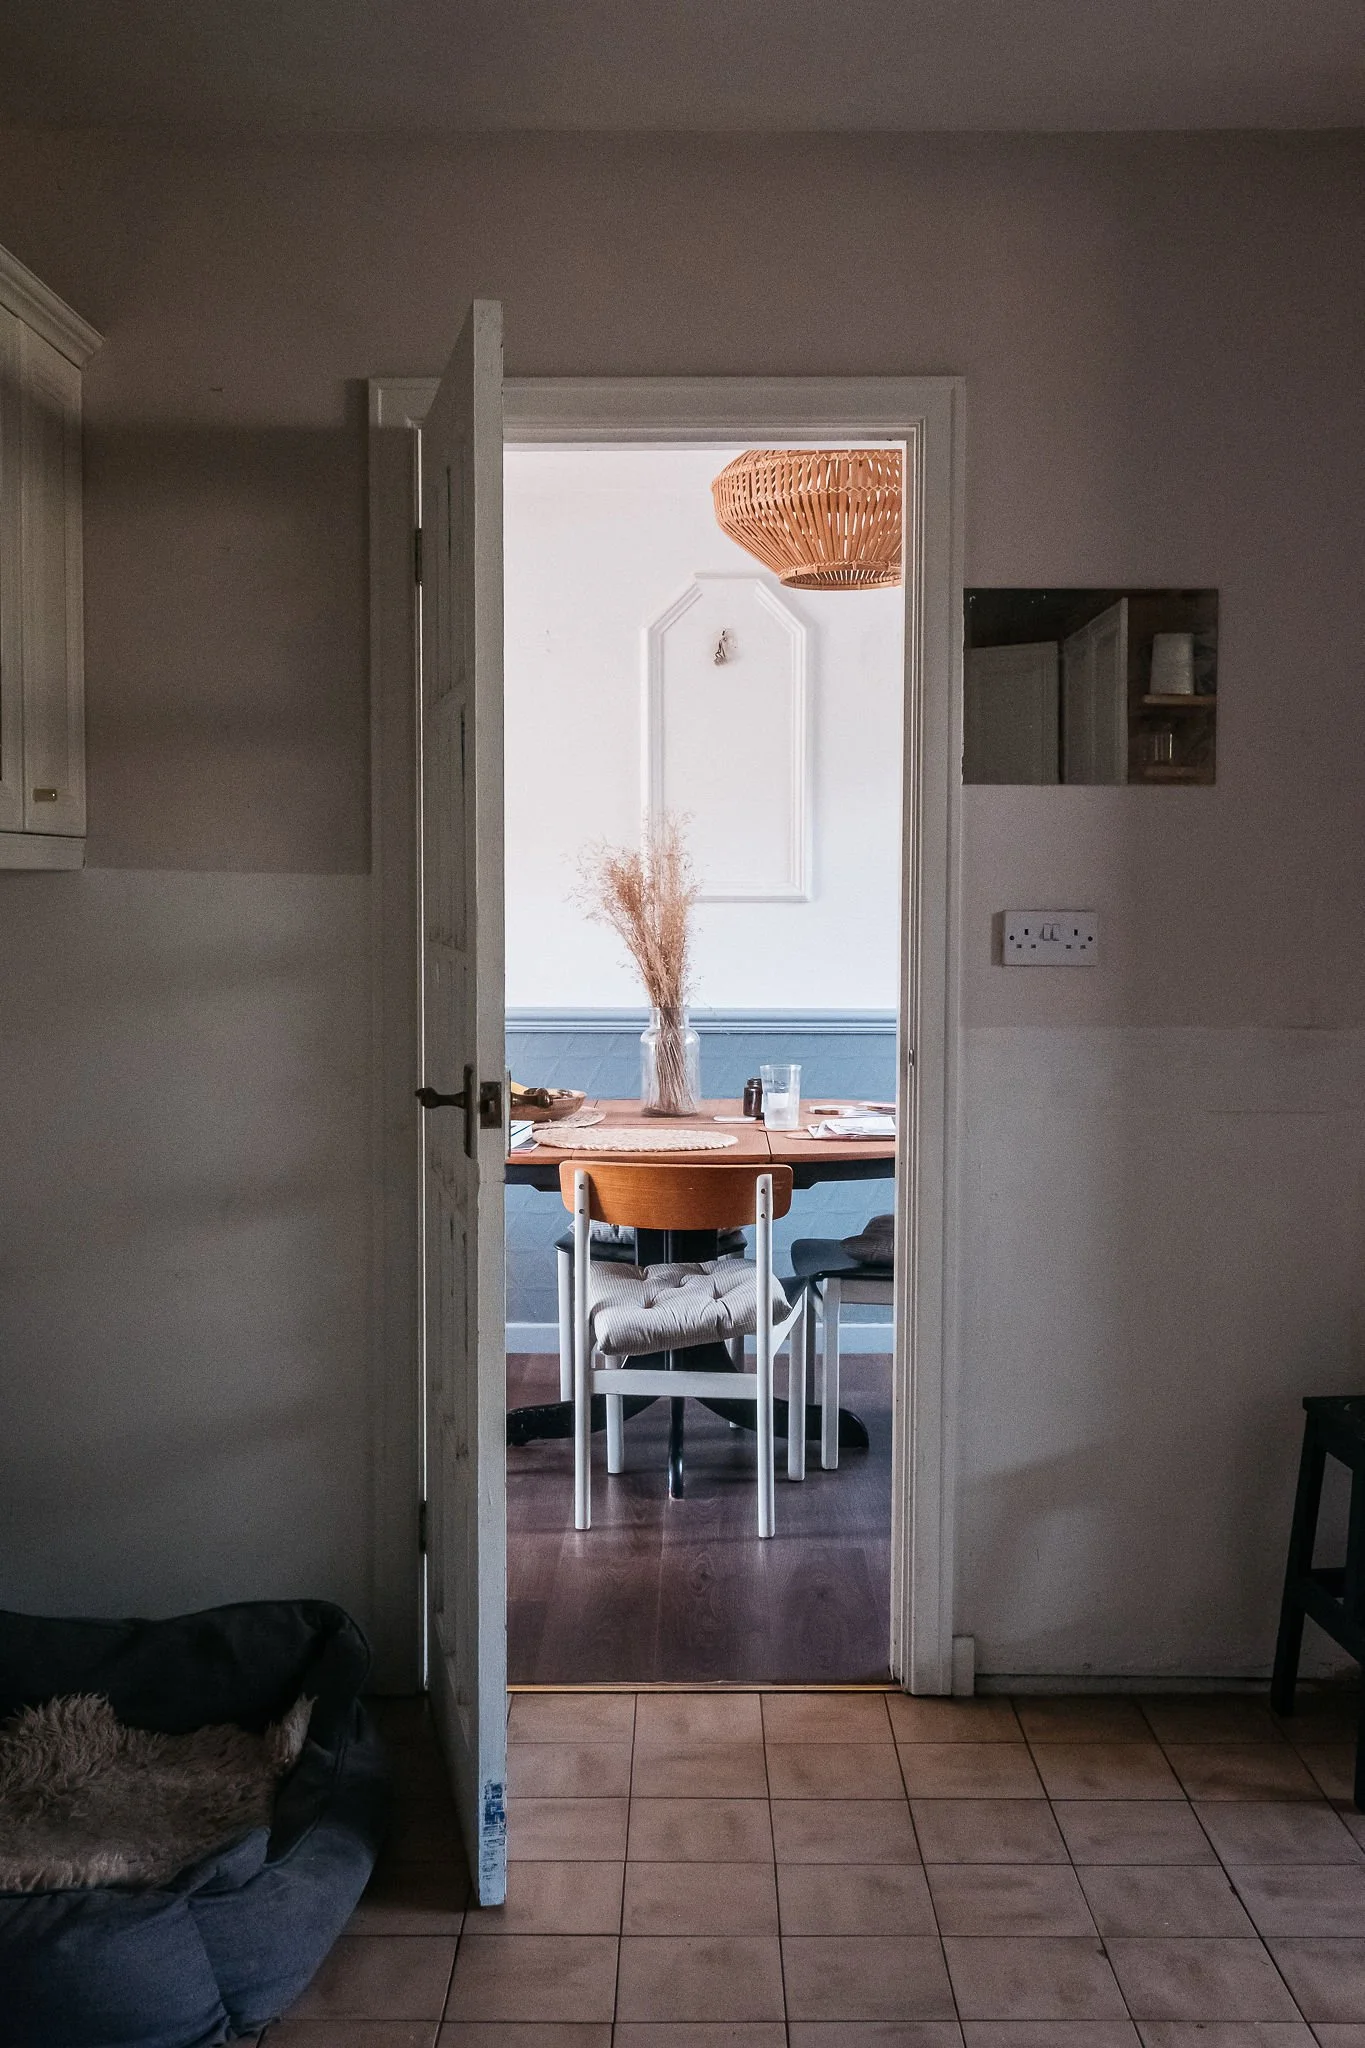
Interiors: The Dining Room Transformation.
I was pretty sold on no.7 from the Rightmove pictures - I just saw opportunity and space to grow and after living in various small rental properties for years. The house was well in my small budget due to the area it was in and the aesthetic work needing doing but it had so much potential. While obsessively pawing through the images a hundred times I wondered about the dark area of the kitchen and whether I would be able to utilise the dining room for it’s purpose as it looked too small for a decent sized dining table.
When I viewed the house, I was instantly struck by indeed how dark the one half of the kitchen was - this is the half the dining room joined onto. But the estate agent showing me around knocked on the wall in-between the kitchen and the dining room, said it was a stud wall and suggested it could come down to let the light flow through. In that moment, my decision was made to buy the house - everything else about it was perfect for me and my needs.
A few before images


In January of this year, 5 months after moving in, it became clear I wasn't going to be able to move on with any of the renovations until the stud wall came down. It was time to tackle it but I felt a little daunted and not knowing what the project was going to bring. Apart from fitting the kitchen sink and worktop, it would be my biggest DIY project ever and I’d never done anything like it.
I watched a number of YouTube videos on taking a stud wall down, set aside some time but then suddenly got the fear - would taking this wall down weaken the house? Would the house crash down around me? I catastrophised and then pulled myself together and did what any reasonable person would do and logon to Facebook… I am kidding. But I did logon to Facebook and ask for a good structural surveyor on a local group - these appear to be gold dust in the Derbyshire Dales but I was incredibly fortunate to have a chap message me and say he used to be in that line of work and he’d be happy to come and have a look. He did come over and checked it all out - after some investigation it turns out steel beams are keeping my house absolutely solid so happy days. But if you’re considering taking down a stud wall I’ve learned it’s not as black and white as stud walls not being supporting walls. It turns out over time they can become supportive in your home so do get it properly checked out before you crack the sledgehammer out!

Getting stuck in
So, it was time for me to make a start. I began by removing skirting boards and the dado rail with a strong stripping knife. Then, with a Stanley Knife, scored along the plaster board in all corners off the stud wall. I then removed the door frame using a crowbar but this was a bit trickier so took some head scratching and brute force.
This is where is got very dusty… using a hammer in a hollow bit of wall I created a hole and started prising away the plasterboard from the stud work. It was a lengthy process and not simple as some bits were really solid. I tried not to have too much of a plan at this point as it just needed to be worked away until I was left with as much bare stud as possible.
I did have an electrical socket point running down the wall which was fixed to either side of a stud joint. While I would always recommend getting an electrician to sort jobs like this I have done a bit of wiring in my van so I cut off the power supply to the house, removed the socket and thermal taped off the ends then safely tucked the wires out of harms way until my electrician could get to it. I then carried on with removing the plasterboard, creating a whole lot of dust in the process.
Once the plasterboard was off (well mostly as some was well and truly stuck on to the stud work) I needed to figure out how to remove the studwork. I used a saw to cut a number of points and then, as the studs were secured with long nails, gently prised them away. I recommend making sure you bang in your nails as you go to minimise the risk of any accidental stepping on them. Then after a lot of clean up it was time to take stock and figure out what was next.
Life after the stud wall
I was a bit naive to think I could just take the stud wall down and paint. Of course like any DIY job, when you start you end up wanting to do the job properly while you’re at it and it opens a can or worms! I started by stripping the wallpaper in the whole of the room which was no small job - I think they must have used industrial glue to put it up as I had to work at it inch by inch, taking away half of the plaster underneath. It was becoming clear that this wasn't a case of patching up and it was going to need a pro. Luckily, I found one of those after a bad experience with another plasterer and got the job done some weeks after stripping.
I did have a major win in the process (which is always nice) - I thought that the ceiling was textured or even artex and had had a separate quote of £1k to board and plaster but when I took the stud wall down I discovered it was just textured wallpaper and it stripped off beautifully to reveal smooth and flawless plaster (except where I had hacked the coving off). It turned out the same wallpaper was also covering the ceiling in the lounge so I definitely won back a bit of budget there.
I also needed to think about how I was going to remove evidence of the wall being there as the ceiling and floor were both left with gaps. The kitchen ceiling is slightly higher than the dining room so I had to fashion a fake beam out of a strip of MDF (as it was lighter than wood) and some beading glued onto one side of it. With the floor, until I can afford to replace it I used a piece of skirting board between the laminate flooring in the dining room and the kitchen floor tiles. I glued it down with grab adhesive and painted the same colour as the kitchen floor but as a large rug runs over it it looks fine for now.


The vision started to take shape
Once the plastering had been done I painstakingly filled all the holes in the ceiling where I’d taken the coving down and sanded them. And sanded them again. And filled again. And sanded again.
I then caulked all corners of the room to leave a smooth finish and started to think about painting.
I won’t bore you with my paint choosing story but who knew choosing a neutral would be so hard?! I tried so many samples but as this is an open plan space with some of it being north facing and some being south facing I was limited with my choices. I obsessed for months and was finding it hard to find one that was warm enough but not too warm for the living room and all its light. I finally settled on The Needles by Fenwick & Tilbrook. I will admit, I didn’t like it when I first got it up - it seemed to have grey undertones but once I had the second coat up I started to like it and was too knackered and broke to think about changing it. But fast forward 6 months and with the lounge done I absolutely love it now as the colour that flows through my whole downstairs.
If you want to read about how I prepped and painted my walls, check out my blog post on that here.
Finishing touches
I really wanted to go with a statement wood in this room to beautifully compliment the creaminess and calmness of the paint colour. I wanted to avoid trends and just go with what my heart was drawn to which is beautiful deep woods, soft fabrics, understated storage and classic black accents. I wanted the dining room to be a space that I could invite friends and family into and them to feel at home and calm. It also needed to flow into the kitchen so keeping that homely, slightly retro vibe yet look modern. A big ask I know but I hopefully pulled it off!
I’ll be doing a separate blog post soon on how I sourced and treated a table to create a beautiful walnut piece. I’ve also got another post coming for the Ivar makeover that sits along the awkward supporting wall between the kitchen and living room.
Here are the after pictures, what do you think?


Sharing is caring.
Pin me to Pinterest.
Hit the pin button to the top left of the image as you hover to share to Pinterest.


A floor to ceiling DIY dark wood shelving and desk fitted unit with a retro 70’s aesthetic.